In a well designed home, every room has its focal point, be it a bold colored wall, a vibrant rug, or stunning piece of artwork. In the bathroom, the vanity area usually runs away with the show…that is, if it’s worthy. What’s that you say? Yours is not? Ah, have no fear! That can all be fixed with some elbow grease, paint and new hardware. Painting your vanity and changing out your drawer pulls honestly is not as daunting as it might seem at first mention, and as a quick weekend project, it’s a simple way to kick your bathroom up a few notches. We break it down for you so that by Sunday, your vanity will be stealing the spotlight!
What you’ll need:
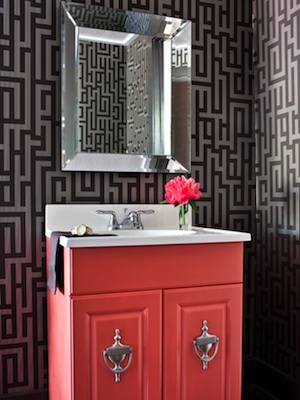
- New hardware of your choice. Try bar pulls for a modern look, glass knobs for cottage chic, or metal front door knockers (as pictured) for a unique touch.
- Basic tools; i.e. screwdriver, wrench, tape measurer, drill with bits
- Wood filler
- Putty knife
- Enamel paint in your choice of color (semi-gloss, or high-gloss works best, depending on that finish you’re after)
- Primer
- High quality paintbrush (or else you’ll be picking lost bristles out of your paint job for hours)
- Pencil
- 80-120 grit sandpaper (a sanding block is easiest to work with)
Now, get to work!
Step 1. Remove cabinet drawers and doors and set aside hinges (if your hinges are a different finish then your new hardware, a quick coat of spray paint will be necessary).
Step 2. Unscrew the current hardware on your cabinet fronts.
Step 3. If you are changing the placement of your new hardware, fill holes left from the old hardware with wood fill, and smooth out with putty knife. (If not changing location, skip to Step 5.)
Step 4. After wood filler is fully dry, sand the front surface of the drawer/door, smoothing out any filler. Wipe down with an old rag and let air-dry.
Step 5. Prime! (This step is important, because primer helps paint adhere to a surface better, which means longer lasting results and fewer coats.)
Step 6. Once primer is completely dry, lightly sand the surface to ensure smoothness, and wipe down any dust.
Step 7. Paint! Two coats of enamel paint should be enough, but if after two coats, you’re still not happy with the finish, paint one more coat.
Step 8. While drawer/door fronts are drying, attend to the vanity frame in the bathroom. You’ll want to lightly sand the surfaces to prep for painting, and then follow Steps 5-7.
Step 9. Once all the paint is dry, reattach your cabinet fronts and slide in any drawers.
Step 10. If you chose to change your hardware placement, measure out where you want them to go, mark with a pencil and drill a pilot hole in that place.
Step 11. Attach your new hardware.
Step 12. Step back, and marvel at a job well done!
Have you revamped your vanity yourself? Show us your handy work on our Facebook fan page!
*Photo courtesy HGTV.com