Have you ever caught yourself wondering whether the kitchens you see on the pages of design magazines could actually be that perfect? The truth (albeit a semi-frustrating one)? Yes and no. Yes, magazine editors are trained to find expertly designed homes, but no, it also takes a good stylist to create the perfect picture.
In this day and age, many homeowners find themselves in a blunder when putting a house on the market and inevitably having to take and post photos of their own kitchen online; it’s often a challenge to convey the look and feel of a space through a picture. However, with a few pointers the pros use, you can be snapping attractive photos of your own kitchen in no time. Not looking to sell? No problem. Many of these tips will likely impress guests at your next dinner party, too. Here are five simple tips photographers and stylists use to create magazine-worthy shots of any kitchen.
Wipe down counters and appliances. This may seem like a no-brainer, but oftentimes what homeowners don’t realize is that clean doesn’t necessarily mean smudge-free. If you’re shooting with an SLR (single-lens reflex) or other high-definition camera, every crumb, smudge and dust bunny will be visible, even if you can’t see it with the naked eye. A quick wipe-down of countertops, appliances, sinks and faucets with an antibacterial spray and a paper towel will do the trick.
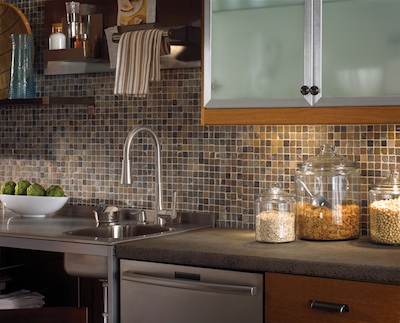
Display fresh flowers and fruits. Flip through a magazine and try to find a shot of a kitchen without a bundle of fresh flowers, or a plate of fresh produce, on display. Odds are you won’t be able to. That’s because in film, flowers make everything better, from introducing a pop of color to adding a clean, romantic feel to the space. Varieties that work well are hydrangeas and peonies or, for something more architectural, a tall, clear vase with a sparse handful of cherry blossoms. Fresh fruits such as apples, pears, bananas, lemons and limes (make sure the stickers are removed and that the brown spots aren’t showing) displayed on a simple white plate, or in the sink, also help to make a kitchen feel more authentic. Here’s an example that features the Pfister Ashfield Pulldown kitchen faucet.

Eliminate kitchen clutter. That twisty-tied plastic-wrapped loaf of bread? Pantry. Your favorite, partially-melted-on-the-edge spatula? Pantry. Your collection of fridge magnets from every family vacation you’ve been on since you were 12? Pantry (temporarily). Think simple and basic when staging the kitchen for a shoot. Hide anything personal and, except for a small plate of fruit, anything that indicates the fact that you, well, eat.
Stow extra accessories away. On the topic of minimalism, deleting less attractive or purely functional appliances (like a microwave or 10-year-old coffee pot) is another way to edit your countertops. Things that can’t be removed, such as electrical outlets, can be hidden by strategically placed vases and smart placement of the camera. A few photo shoot favorites you should consider having on hand: a pretty tea kettle, an elegant crystal cake stand, and a candy-apple red Kitchenaid mixer (a personal fave!).

Let there be light. A kitchen benefits from a substantial amount of light in photo shoots, partially because the room is meant to be a cheerful, lively gathering spot. Many photographers wait until the sun is at its brightest to shoot this room, say 12 or 1 o’clock in the afternoon, to achieve the most natural look.
Whether you’re staging your kitchen for a shindig, sale, or photo shoot, let us know how these tips work for you in the comments below.